Angle Gauge
What it is and how to use it. A set of small wireless nodes that clip to an aircraft and read the angle between two surfaces — incidence, decalage, control throws, differential — to about 0.01°, without ever leveling the aircraft.
Want to get started?
Flash the firmware to each node straight from your browser — no toolchain, no app store.
What it is
The Angle Gauge is a fleet of identical little nodes — each an M5StickS3 with a screen, a battery, and a motion sensor. Every node measures its own tilt against gravity and broadcasts it. Clip one to the wing and one to the stabilizer and a node shows you the difference between them directly.
That difference is the whole point. Because both nodes feel the same gravity, whatever attitude the fuselage happens to be sitting at cancels out — so the aircraft never needs to be leveled to measure decalage, incidence, control throws, washout, or symmetry. It resolves to roughly 0.01°, about 10–30× finer than a hobby angle meter (a Robart analog reads to 0.125°; digital angle cubes to about ±0.2°).
There is no master and no hub. Every node runs the same firmware, self-assigns a role (A, B, C…), and any node can put up a phone console on demand. Want the engineering behind it? See the design notes.
What you need
- Two or more M5StickS3 nodes — ESP32-S3, 1.14" LCD, speaker, 250 mAh LiPo, with the Bosch BMI270 IMU built in. One node works for a single absolute angle; two or more unlock differential readings.
- A USB-C cable to charge and to flash.
- A Chromium-based desktop browser (Chrome, Edge, or Opera) for the one-time flash. A phone is optional — only needed if you want the web console.
Getting started
- Flash each node. Plug a node in, open the flash page, and install the firmware. Repeat for every node — they all get the same image. Settings survive a reflash.
- Power them on together. The first node to boot claims role A, the next B, and so on. Roles stick (they're saved on the device), so a node keeps its letter across power cycles.
- Let them warm up. For best-case accuracy, give a cold node about 15 minutes before precision work.
Take a differential reading
The typical job — say decalage between wing and stabilizer:
- Pair-zero first. Sit both nodes flat on one true surface and run Match 0 — hold the blue button on either node for about 1.5 seconds, or use the console Setup screen. Each node shows MATCH?, then beeps and zeros itself once its reading settles. This cancels the fixed offset between the two units — the dominant error in differential work.
- Clip them on. One node on each surface you're comparing.
- Wait for green. Each node runs a MOVING → SETTLING → STABLE cycle. Grey means it's moving, yellow means it's settling, green means the reading is trustworthy. Hold still and let it reach green.
- Read the difference. Pick one node as the datum; the other shows the live angle between them. The aircraft can sit however it likes.
The three measuring modes
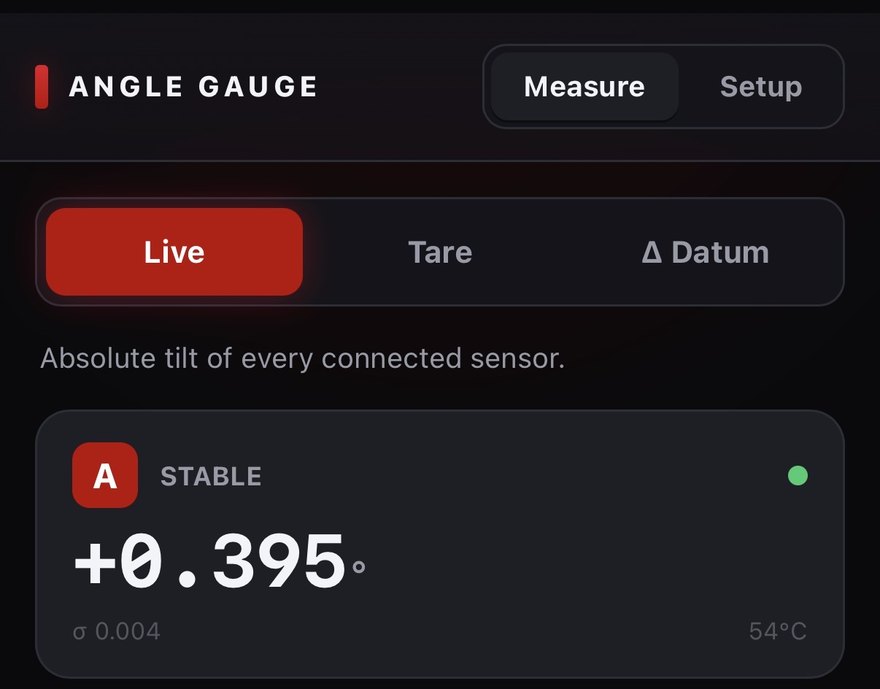
Most rigging measurements are a combination of three primitives — set from the phone console (and mirrored on every node's screen):
| Mode | What it shows | Use it for |
|---|---|---|
| Live | Each node's own absolute tilt | A single angle — dihedral, a surface against a level bench |
| Tare | Zeroes now; then shows change from that zero (NET) | Control throws — zero at neutral, then read the deflection |
| Δ Datum | Live difference of every node against a chosen reference node | Decalage, incidence, washout, L/R symmetry |
On-device buttons
You can do the common things without a phone at all:
| Button | Action |
|---|---|
| Blue button (BtnA) — press | Tare: first press arms it, then it zeroes at the next stable reading. Press again to clear. |
| Blue button (BtnA) — hold 1.5 s | Match 0: zeroes all nodes together, no phone needed. Sit them on one flat surface first; each node shows MATCH?, then beeps and zeros once its reading settles. A short press cancels. |
| Side (BtnB) — short press | Cycle which other node you're reading the difference against. |
| Side (BtnB) — long press (1.5 s) | Turn the phone console (Wi-Fi hotspot) on or off. |
| Side (BtnB) — held while powering on | Reset a stuck role and re-assign from scratch. |
| Power (side) | Sleep / power the node off now. |
The phone console
For the full set of measurements — and a nicer interface — any node can host a small web app:
- Long-press the side button (BtnB) on any node to start its hotspot.
- Join the Wi-Fi network named F3A Angle Gauge from your phone — the password is anglegauge.
- Open http://192.168.4.1. It usually pops up on its own. On iPhone you can use Add to Home Screen to keep it one tap away.
The console has two areas. Measure gives you the three modes above plus about two dozen ready-made measurements built on them — rigging (decalage, incidence, washout, symmetry, dihedral, thrust line), throws (endpoints, differential ratio, L/R match, rates, flaps), and helicopter setups — along with auto-capture that grabs a reading each time a surface settles and chirps. Setup holds Match 0 (the pair-zero) and the motion/settle thresholds.
Accuracy tips
- Everything is in degrees.
- Zero shortly before measuring; allow ~15 minutes of warm-up after a cold power-on.
- A node weighs about 20 g, enough to deflect a light surface — if in doubt, do a ballast test to see whether it moves.
- For incidence, your accuracy is limited by the chord-line fixture you clip to, not the electronics.
Power & battery
- Auto power-off after about 3 minutes idle (with a 10-second on-screen countdown first) — the pair counts as "in use" while either node is moving.
- Wake a slept node with its power button; role and zero are remembered, tare and datum reset.
- Battery % shows bottom-left; a cyan + means it's plugged in.
Troubleshooting
| Symptom | Fix |
|---|---|
| Flasher says "Failed to initialize" | Put the node in flash mode: hold the power button ~6 s until the screen goes dark (it has a battery, so unplugging USB isn't enough), then retry. See the flash page for the full checklist. |
| Two nodes don't see each other | Make sure both are flashed with the same firmware and powered on together. If a role looks stuck, hold the side button (BtnB) while powering the node on to re-assign. |
| Console shows stale numbers after a reflash | Refresh the web app (or remove and re-add it to your Home Screen) — the cached copy keeps calling the old version. |
| Reading won't settle to green | The surface (or the bench) is still moving, or the node is being nudged. Steady it and wait; drafts and a bumped table are common culprits. |
Ready to try it?
Flash a node from your browser and pair it with a second one for differential readings.